


 Provider Change
Switch from another hosting provider to the Fishbeam Cloud. The Fishbeam Cloud is the best way to publish your Goldfish website on the Internet.
Switching from another provider to the Fishbeam cloud is very straightforward. We help you make the move seamless and keep the website and all e-mail addresses working without interruption.
With these steps, the change works smoothly:
- Register in the Fishbeam Cloud.
- Publish your websites in the Fishbeam Cloud so that they are stored with your old provider and in the Fishbeam Cloud.
- Start the move of the domains into the Fishbeam Cloud.
- If necessary, create existing e-mail addresses of the domains in the Fishbeam Cloud.
- Cancel the contract with your old provider.
If you follow these steps, the Fishbeam Cloud is already set up at the time the domains are transferred to the Fishbeam cloud and everything will continue to work without interruption.
Register in the Fishbeam Cloud
You need an account for the Fishbeam Cloud to load your website into the Fishbeam Cloud and publish it on the Internet. These account can be obtained from the website https://www.fishbeam.com/en/cloud/. Because of this, visit this page at first.
Choose between different packages for the Fishbeam Cloud. These differ essentially by the maximum number of websites that you can load into the cloud. You can test each package for 10 days free of charge and without obligation.
 You can also upgrade the package later if you want to load more websites in the Fishbeam Cloud and your booked package is not enough.

Click on the Register button below the desired process (you will have to scroll down the page). It will redirect you to Digistore24 to complete the registration.
With Digistore24 you can choose between different payment plans and payment methods for the desired package of the Fishbeam Cloud. Enter all required data there.
Even if Digistore24 asks for payment data, we do not process any payments. The payment will only processed after the free trial period. You can cancel your Fishbeam Cloud package at any time during the trial period and you will not be charged.
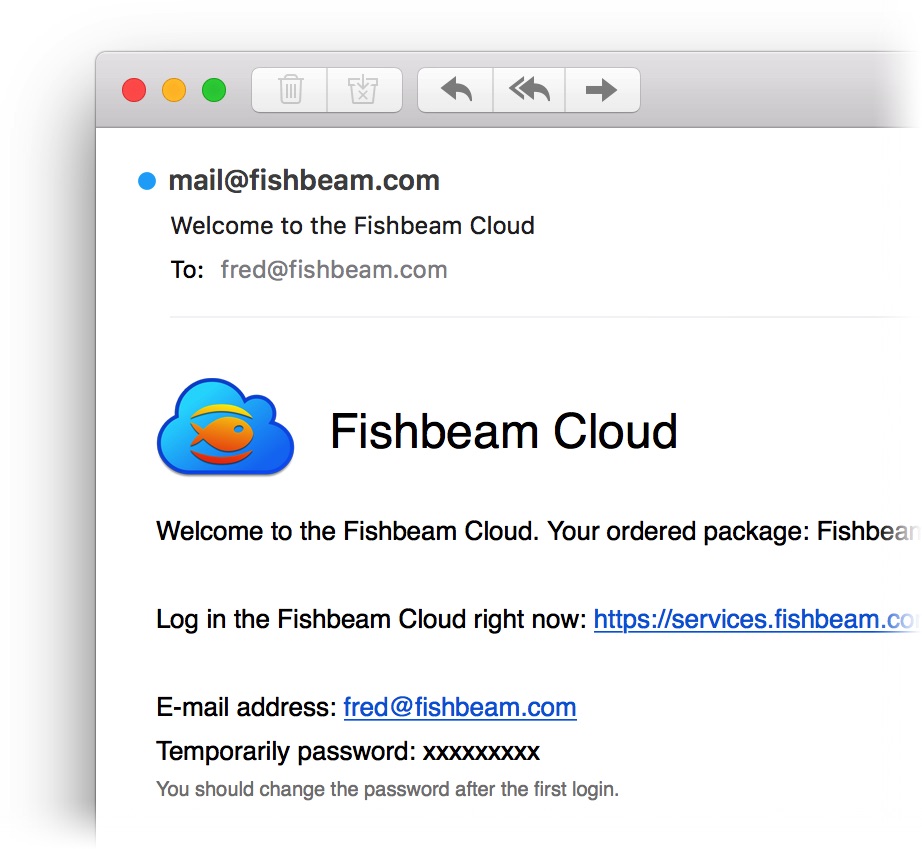
After successful registration you will immediately receive an e-mail with your account data for the Fishbeam Cloud. This allows you to publish your website in the Fishbeam Cloud and on the Internet.
Publish Your Website in the Fishbeam Cloud
Start Goldfish and open your website. Then choose File> Publish Website As... from the menu. Your website will be generated and the Publish window will be opened.
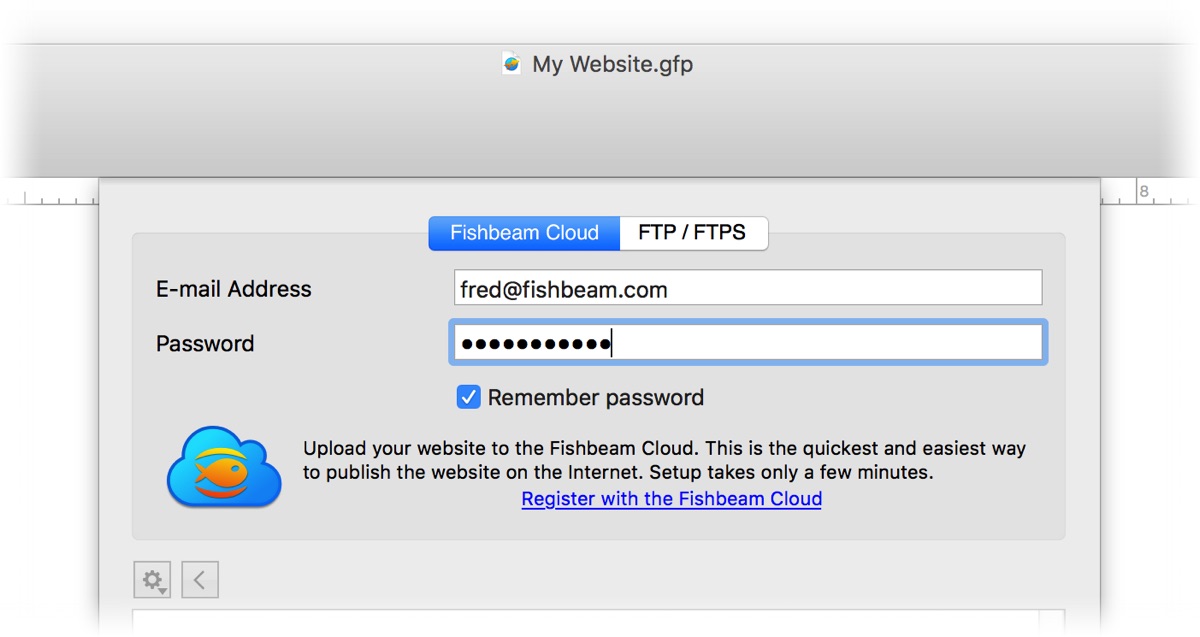
Enter your access data received via e-mail on the tab Fishbeam Cloud and click on Connect.
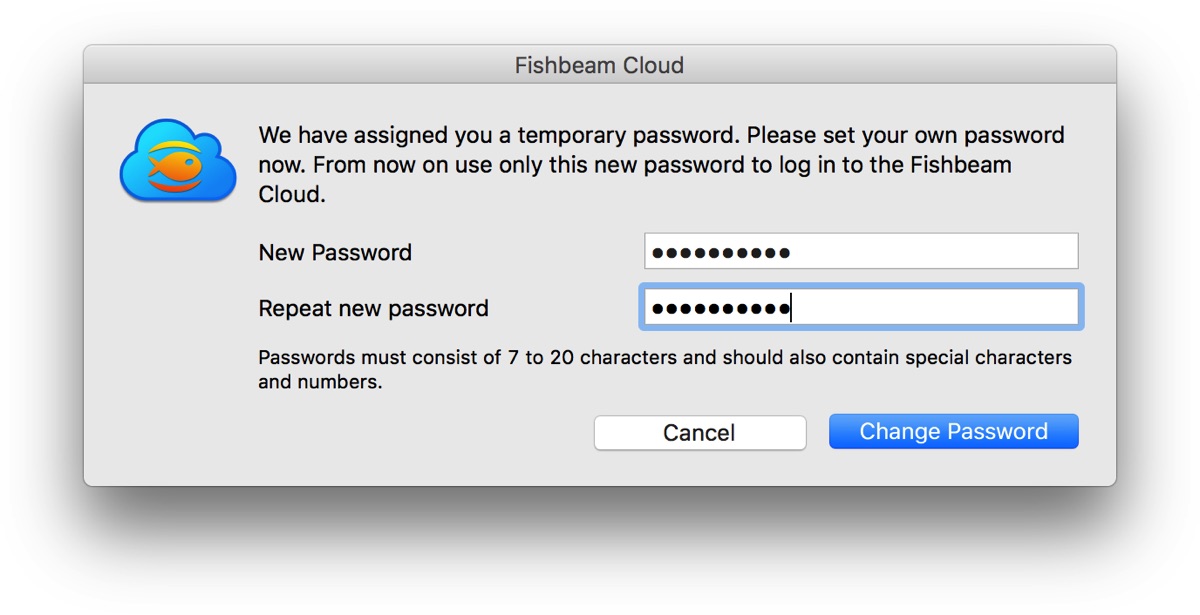
If you log in with the temporary password from the welcome e-mail, you will be asked to set a new password. Confirm this with Change password.
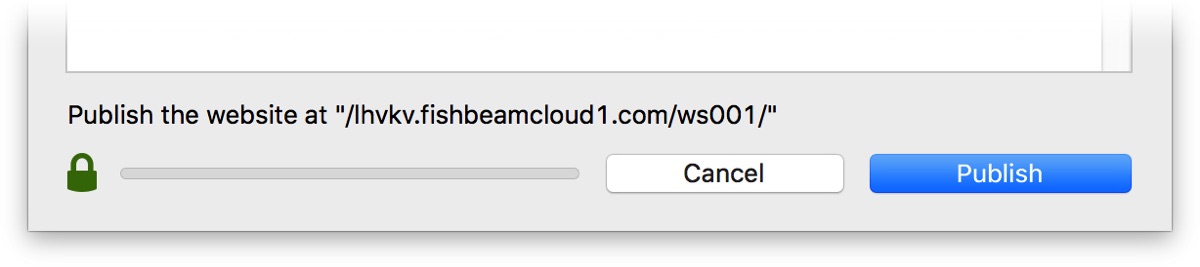
Click Publish and Goldfish will upload your website to the Fishbeam Cloud.
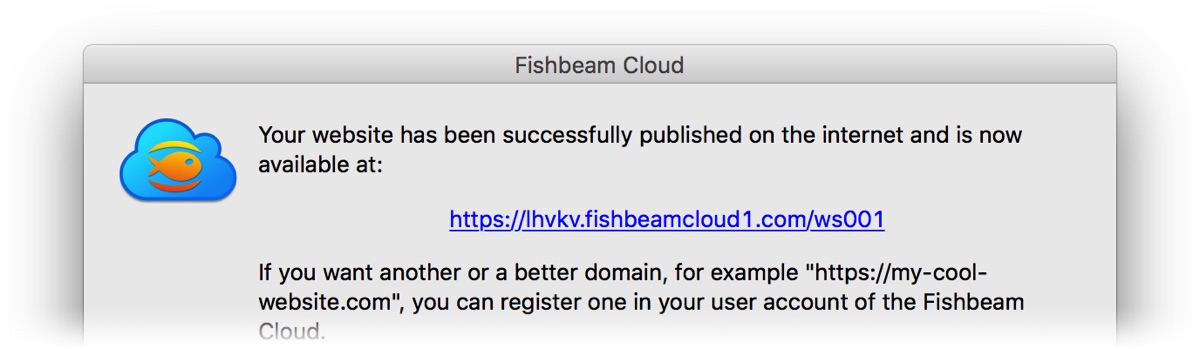
Your website will be online immediately after publishing and can be reached worldwide via the address shown. Try it out right now!
Transfer the Goldfish Website Data
If you use the Counter, Blog, Guest Book, or File Upload Forms on your Goldfish website, Goldfish stores data such as counter readings, blog and guestbook entries, and uploaded files in the support/saved folder. You must transfer this data to the Fishbeam Cloud so that it remains available. This is possible with an FTP app. We use Cyberduck for this:
- Download and install the app Cyberduck.
- Start Cyberduck and select Open Connection. Log in to your old provider and load the folder support/saved with its contents on your computer.
- Log in to the Fishbeam Cloud user account.
- Click FTP > Show FTP access data to see the FTP credentials.
- Log in to the Fishbeam Cloud with your FTP credentials.
- Switch in Cyberduck to the correct folder by double-clicking. The first website is in the folder ws001, the second one in ws002, etc. Find the folder support and switch to it.
- Go to the downloaded saved folder in the Finder (Mac) or Explorer (Windows) and select it.
- Drag the folder into the Cyberduck window. The corresponding folder in the Fishbeam Cloud should be replaced.
If you have difficulties with this point, we are happy to help. Just contact the Fishbeam Support. If you do not use any of the above features on your website, or you do not want to transfer the data, you can skip this point.
Create More Websites in the Fishbeam Cloud
If you want to move multiple websites to the Fishbeam Cloud, you'll need to add more websites first. Skip this step if you only want to move one site to the Fishbeam Cloud.
Log in to the Fishbeam Cloud user account to create more websites. Click on Websites & Domains.
Click Add New Website to add another website in the Fishbeam Cloud. You can only add as many websites as your package allows. If you need more websites, you can upgrade your package. Please read the chapter Contract for this.
Publish your other websites as described in the section Publish Your Website in the Fishbeam Cloud. Please note that when you publish, you must now select the correct folder for your website.
Transfer the Domains
Start the domain transfer to the Fishbeam Cloud. Since a domain transfer is not instantaneous, you have plenty of time to properly configure the domains in the Fishbeam Cloud.
Release the domains at your old provider for transfer. Then you will get an auth code in most cases. You need this for the following domain transfer.

Log in to the Fishbeam Cloud user account to initiate a domain transfer. Click on Show websites & domains and scroll down to Order a New Domain (Internet Address).
Enter your domain in the field, select the correct domain extension and click Check Availability. Since the domain already belongs to you, Domain reserved is displayed.
Click on the button Order Domain. You will be redirected to Digistore24 to complete the transfer. Enter all required data there.
Be sure to enter the auth code for the domain when ordering. If the auth code is not yet available, you can also send it to us later by e-mail. Write to the Fishbeam Support.
Allocate the Domain to Your Website
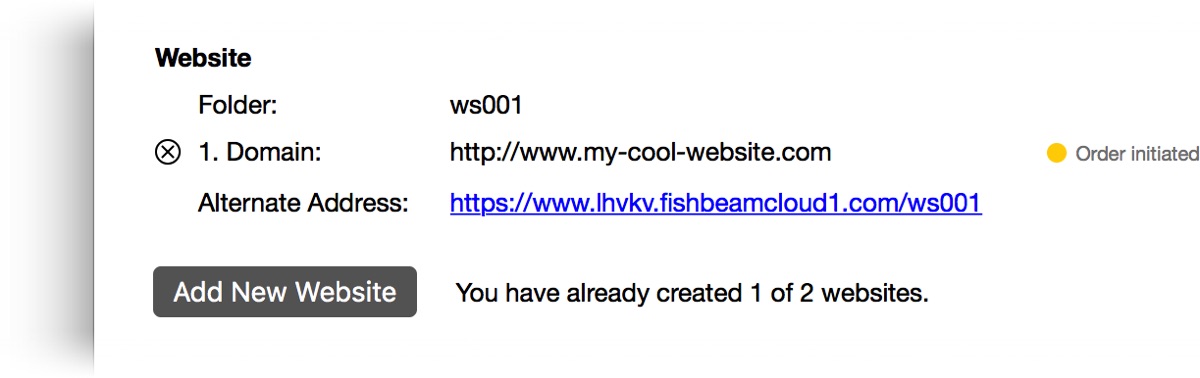
After successful order, the domain appears at Websites & Domains > Not Allocated Domains (this may take a few minutes).
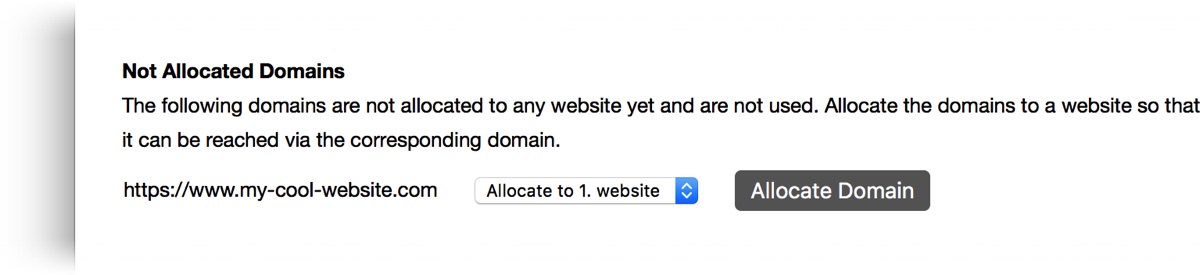
Select your desired website (only if you have already created several websites in the Fishbeam Cloud) and click on Allocate Domain.
Your domain will now be displayed on your website and marked with the note Order initiated. It takes a few working days for the domain to be successfully ordered, set up and your website accessible.
Allocate all your domains to the respective website.
Create E-Mail Addresses
If you have created e-mail addresses for your domains with your old provider, you should also create them in the Fishbeam Cloud. So no emails are lost when the move of the domains is carried out.
Log in to the Fishbeam Cloud user account to create an e-mail address. Click Show e-mail addresses.
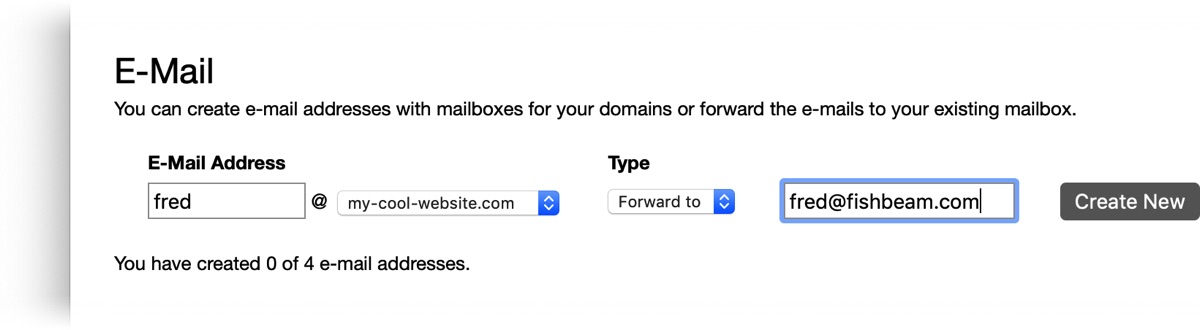
Enter the desired e-mail address at E-Mail Address (only the part before @). Select the desired domain for your e-mail address. At Type you can choose between two options:
- Forward to forwards all e-mails to an existing e-mail address. Enter the desired e-mail address to which everything should be forwarded.
- Mailbox creates a mailbox where you can manage your e-mail directly. Enter a new password for the mailbox.
Click on Create New to create the e-mail address in the Fishbeam Cloud. You can only create as many e-mail addresses as the maximum of your package allows. If you need more e-mail addresses, you can upgrade your package. Please read the chapter Contract.
Cancel the Contract With Your Old Provider
As a last step, you can cancel the contract with your old provider. It's best to wait until all domains have successfully moved. Do not forget to save any needed data like emails before cancelation.