


 Visitor Counter
Add a visitor counter to your website. With a visitor counter you can show the number of visitors of your website.
You can add a visitor counter to each area, slider area and area template. To add a visitor counter, edit the content of an area, slider or area template and drag a visitor counter item from the items to the editor.

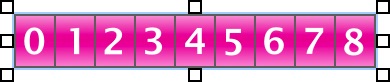
A visitor counter counts every visitor of your website and displays the number of visitors as a picture. Returning visiors are counted once in 24 hours. Change the properties from the section Visitor Counter from the properties to change the style of the counter.
The property Visitor Counter > Style sets the style of the counter. You can choose from a couple of styles in different colors. Visitor Counter > Digits sets the size of the counter. If the counter reading is too big for the number of digits, the last digits will be cut off.
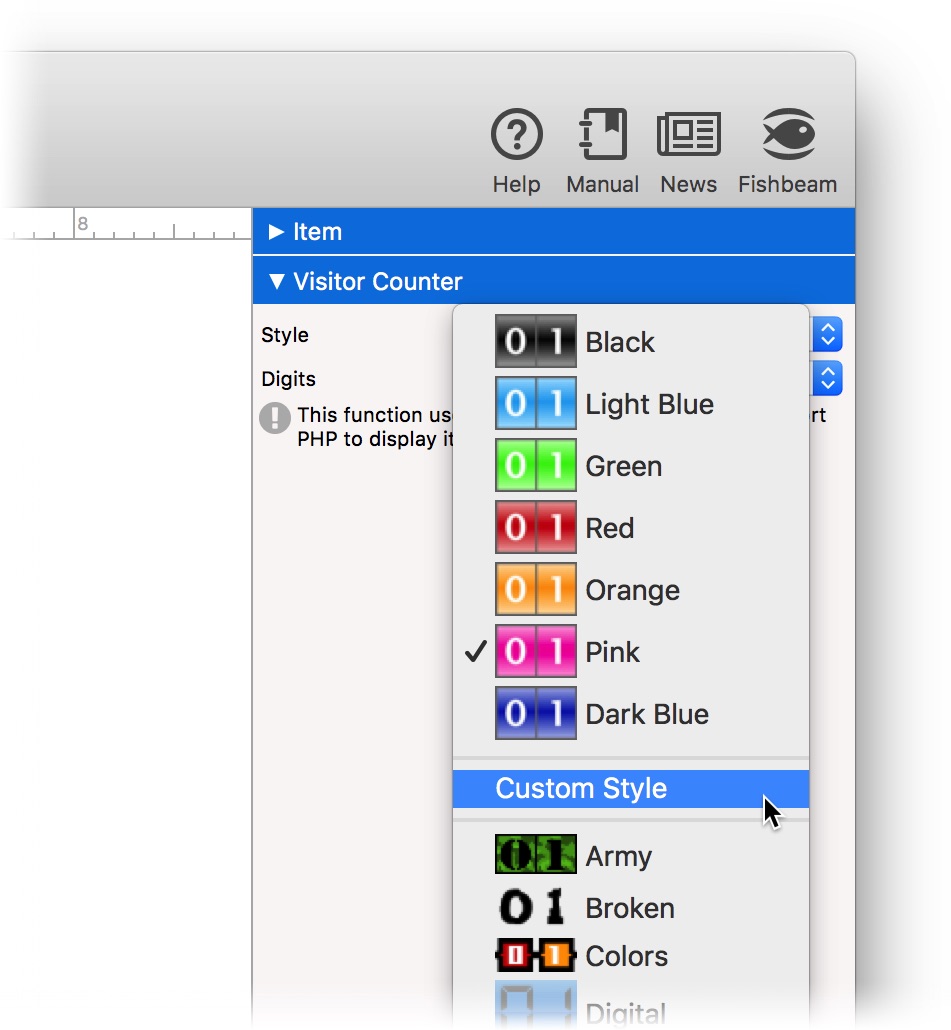
 If you have Goldfish Clips installed, there are many more counter styles available. If not, there are only seven built in styles.
If you don't like the built in styles, you can create a custom counter picture. The counter picture is a small image with the digits 0 to 9 on it. The counter script cuts out every digit which is needed, and puts them together to the displayed counter reading.

Choose Custom Style at Visitor Counter > Style from the properties and select your created counter picture. On Retina websites your counter picture will be displayed in double resolution, but half the size.
This item uses PHP. Your webserver must support PHP to use it.
Properties for Visitor Counters
These properties can be set for a visitor counter. Select a visitor counter to see its properties.
| Item > Identifier (Id) | Specifies the name of the item in order to address it in animations or as a link target. Use only letters and numbers for the name, no spaces or special characters. |
|---|---|
| Item > Left | Sets the distance in pixels from the left side of the item to the area where the item is located. |
| Item > Top | Sets the distance in pixels from the top side of the item to the area where the item is located. |
| Item > Width | Sets the width of the item in pixels. |
| Item > Height | Sets the height of the item in pixels. |
| Item > Padding Left | Sets the distance from the left side of the item to the content in pixels. |
| Item > Padding Right | Sets the distance from the right side of the item to the content in pixels. |
| Item > Padding Top | Sets the distance from the top side of the item to the content in pixels. |
| Item > Padding Bottom | Sets the distance from the bottom side of the item to the content in pixels. |
| Item > Background Color | Select a background color for the item. |
| Item > Background Picture Clip | Select a background picture from the Fishbeam Clips library. This option is only available if you have the Fishbeam Clips library installed. |
| Item > Background Picture | Select a background picture for the item. With Repeat, you can choose how the picture will be displayed. On Retina websites the background picture will be displayed with double resolution, but half the size (except SVG images). |
| Item > Repeat | Repeats the background picture.
|
| Item > Position Horizontal | Sets the horizontal position of the background picture. If the picture will be repeated, it will be placed once on the specified position and the remaining space on the left, on the right, above and below will be filled. |
| Item > Position Vertical | Sets the vertical position of the background picture. If the picture will be repeated, it will be placed once on the specified position and the remaining space on the left, on the right, above and below will be filled. |
| Item > Fix relative to Browser window | The position of the background picture is calculated on the basis of the browser window. The picture is pined to the window and will not move when scrolling. The picture can be hidden or only parts are visible if it is outside of the visible space. |
| Item > Border Left Width | Displays a border on the left side of the item in the choosen width (pixels). |
| Item > Border Left Color | Select a color for the left border. |
| Item > Border Right Width | Displays a border on the right side of the item in the choosen width (pixels). |
| Item > Border Right Color | Select a color for the right border. |
| Item > Border Top Width | Displays a border on the top side of the item in the choosen width (pixels). |
| Item > Border Top Color | Select a color for the top border. |
| Item > Border Bottom Width | Displays a border on the bottom side of the item in the choosen width (pixels). |
| Item > Border Bottom Color | Select a color for the bottom border. |
| Item > Opacity (%) | Makes the item transparent. From 0% (fully transparent) to 100% (completely visible). |
| Item > Rotation | Rotation of the object in a clockwise direction from 0° to 360°. |
Item > Moving Mouse Over Animation  | Select an animation that you have previously created with an Animation item. The animation will be started as soon as the website visitor moves the mouse over the item. |
| Item > Moving Mouse Out Animation | Select an animation that you have previously created with an Animation item. The animation will be started as soon as the website visitor moves the mouse from the item. |
| Visitor Counter > Style | Select style for your counter. |
| Visitor Counter > Counter Picture | Select a custom counter picture if you want to use a custom style for your counter. On Retina websites your counter picture will be displayed in double resolution, but half the size. |
| Visitor Counter > Digits | Sets the number of digits that the counter displays. |