


 Project
Learn how to start a Golfish project. This is the first step if you want to create a website with Goldfish.
To start a new project, you have to decide if you want to start it from a design or a blank website. With a design, you don't have to create the design of your website. With a blank website it will be more work, but the result will be a website with a custom design.
To start a website from a design, choose File > Designs... The design window opens, and you can choose one of Goldfish's default designs.
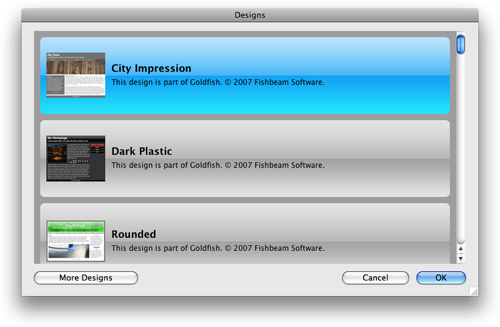
There are many more designs available on our website. Click on More Designs and you will be directed to our design download website. If you have choosen a design, click on OK. A new project window opens.
If you want to start a project from a blank website, choose File > New. A new project window opens.
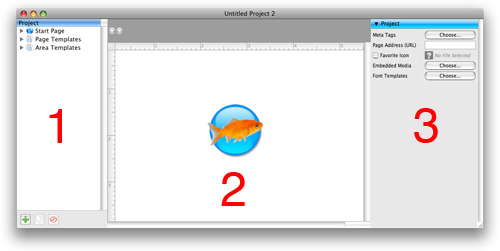
The project window is seperated into 3 different areas: The project list (1). Here are all components of your website listed. Pages (with Start Page as first page), Page templates and area templates. In the editor (2) you can enter text, and edit the content of your website.
The editor is empty at the moment (the Goldfish icon appears), because you have selected nothing. In the properties (3) you can see and set all properties for the components of your website. Here are always the properties of the selected component visible. At the moment the properies for the project are visible, because you have selected nothing.
Goldfish's Page Model
Goldfish builds pages in an innovative and unique way. You have flexible components to create your website. E.g. pages, page areas, text frames, picture frames etc. A page is built out of 3 different layers.
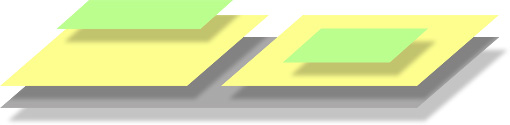
A page (grey) is the base. On a page, there are page areas (yellow), which represent areas of your website (header, footer, navigation, main area etc.). A page area contains page items (green). Page items store the content of your website like images, movies, text...
The Project List
Lets take a look on the project list. If you have started your project from a design, there are already pages, page templates and area templates. Otherewise it is empty. The start page is the first page of your website. If visitors enter your website, the start page will be shown.

Usually a website has on all pages the same style. You can store a layout template in Page Templates and use it on all pages to overwrite their properties with the layout of the page template. You can store a layout template in Area Templates and use it in page areas on all pages.
Templates store the design and style for different pages or page areas in one place. This is useful if you want to change something. Let's say the background color of all pages. If you don't use page templates, you have to change it for every page seperately. If you have defined a page template, you can only change it in the template and it will be applied to all pages, which use this template.
If you have started your project from a design, the next step is to create pages. If you have started your project from a blank website, you should create page templates and area templates for your layout and in the last step pages.
Properties for Project
These properties can be set for the project. Select nothing (the Goldfish icon appears in the editor), to show the properties of the project.
| Project > Meta Tags | Meta tags are used by old styled search engines to find your website. Here you can enter project wide meta tags. Project wide meta tags appear on every page of your website. If you want to set specifical meta tags for a page, you have to use the meta tag property of a page. |
|---|
 Add a meta tag.
 Delete a selected meta tag.
Enter the value of name or http-equiv at Meta Tag Name in the list. Enter the value of content at Meta Tag Value. If the meta tag begins with meta http-equiv=, enable the checkbox at http-equiv.
If you have edited your meta tags, click on OK.
| Project > Page Address (URL) | Enter the absolute page URL of your website here. E.g. http://mydomain.com. This is required if you use rss feeds on your website. |
|---|---|
| Project > Favorite Icon | Here you can choose a FavIcon for your website. A FavIcon is a small graphic in the adressbar (this website uses a small fish as FavIcon). FavIcons must be windows .ico files to show up in Internet Explorer, Firefox, Safari and the others accept .gif and .png as well. |
| Project > Embedded Media | Click on Choose to see a list of all embedded media files of your project. All images, movies and other files, which you use on your website are included. |
The description of every media file is used differently. E.g. as subtitle of a picture in a picture gallery, as alt parameter for images or as title for download links. Doubleclick on a name or description to edit it. Note that there are restrictions for the name (no blanks, no special characters, correct suffix). If you have entered a bad name, a beep occures and the old name will be used.
Click on OK to close the embedded media window.
| Project > Font Templates | You can use font templates to store font styles which you use permanently in your website. Usually a website has only a few different font styles. Click on Choose to open the font templates window. |
|---|
The first template on the list is the "Master Template". Here you can store the default font style for your website. If you don't set a special font for all other font templates, or components, the style of the master template is used.
Add a font template.
 Duplicate a selected font template.
Delete a selected font template.
 Opens the font editor and you can edit the font template.
Double click on a font template to rename it. Please read the fonts documentation to learn how to work with fonts.
| Google > Google Analytics | Google Analytics is a free service from Google. With Google Analytics you can receive complete and detaild user acess statistics for your website. Google will provide you a Google Analytics tracker id to identify your website. Enter the id here in Goldfish. The is coms in this form: UA-XXXXXX-X. |
|---|---|
| Google > Webmaster Tools | Google Analytics is a free service from Google. With Google Webmaster Tools, you can optimize your website for the Google search engine. Google will provide you a meta tag in this form: <meta name="verify-v1" content="Su8Vfdgfgs4EIU6nMZzJ2XFI=" />. Enter only the content of this meta tag: XXXXXXXXXXXXX. |