


 Visitor Counter
Add a visitor counter to your website. With a visitor counter you can show how many visitors where on your website.
You can add a visitor counter to every page area or area template. To add a visitor counter, edit the content of a page area or area template and drag the visitor counter from the elements panel to the editor.
![]()
A visitor counter counts every visitor of your website and displays the number of visitors on an image. Returning visiors are counted once in 24 hours. Change the properties in the section Visitor Counter on the properties pane to change the style of the counter.

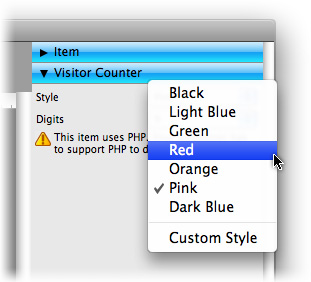
The property Style sets the style of the counter. You can choose from a couple of styles in different colors. Digits sets the size of the counter. If the counter reding is too big for the number of digits, the last digits will be cut off.
If you don't like the built in styles, you can create a custom counter picture. The counter picture is a small image with the digits 0 to 9. The counter script cuts out every digit which is needed, and puts them together to the displayed counter reading.

Choose Custom Style at Visitor Counter > Style on the properties pane and select your created counter picture.
 This item uses PHP. Your webserver must support PHP to use it.
Properties for Visitor Counter
These properties can be set for a visitor counter. Select a visitor counter to show its properties.
| Item > Left | Sets the distance from the left side of the parent element in pixels. |
|---|---|
| Item > Top | Sets the distance from the top side of the parent element in pixels. |
| Item > Width | Sets the width of the item in pixels. |
| Item > Height | Sets the width of the item in pixels. |
| Item > Padding Left | Sets the distance from the left side of the item to the content in pixels. |
| Item > Padding Right | Sets the distance from the right side of the item to the content in pixels. |
| Item > Padding Top | Sets the distance from the top side of the item to the content in pixels. |
| Item > Padding Bottom | Sets the distance from the bottom side of the item to the content in pixels. |
| Item > Background Color | Select a background color for the item. |
| Item > Background Picture | Select a background picture for the item. With "Repeat", you can choose how the picture will be displayed. |
| Item > Border Left Width | Displays a border on the left side of the item in the choosen width (pixels). |
| Item > Border Left Color | Select a color for the left border. |
| Item > Border Right Width | Displays a border on the right side of the item in the choosen width (pixels). |
| Item > Border Right Color | Select a color for the right border. |
| Item > Border Top Width | Displays a border on the top side of the item in the choosen width (pixels). |
| Item > Border Top Color | Select a color for the top border. |
| Item > Border Bottom Width | Displays a border on the bottom side of the item in the choosen width (pixels). |
| Item > Border Bottom Color | Select a color for the bottom border. |
Item > Add HTML Code  | Add custom html code to the item to extend Goldfish's functionality. |
| Item > Add CSS Code | Add custom css code to the item. The code will be stored in the css section of your website. You can't change the css code of internal items, but you can use the css code in your custom html code. |
| Item > Identifer (Id) | Sets the value for the "id" property. You can use this id to access the item with JavaScript. |
| Visitor Counter > Style | Select style for your counter. |
| Visitor Counter > Counter Picture | Select a custom counter picture if you want to use a custom style for your counter. |
| Visitor Counter > Digits | Sets the number of digits, which the counter displays. |